The last couple of days have had my head in a spin, for the last 2-3 years I have invested hours and hundreds in a printing business that I never had the time, or care to advertise, and now, it needs another investment which I am not prepared to do. Its a bit sad, but I think I need to cut my losses, and sell what I can before it is worthless.
My new plan for designing for dollars is using Etsy - a fantastic website which I didn't know existed at the time I paid for my website to be built. Its so incredibly popular worldwide, and I just really believe I'll be able to sell things successfully there and finally start making some money.
I am really looking forward to putting a collection of printable invitations, cards, stationery and party decorations together and sell them to people who will appreciate them on Etsy.
Watch this space.

Monday, July 18, 2011
Tuesday, July 12, 2011
Gymboree: a place for babies to frolic
Yesterday, a girlfriend and I went to Gymboree with our little boys, Rylan & Rowan. We weren't sure what to expect to be honest, we knew that it was some kind of baby class that would involve singing and activities, but what we found was truly wonderful.
There were climbing aparatus and balls to kick and throw and giant logs to roll and a parachute to hide under. Wow, I wish I was a baby all over again. All the activities that they had set up for our class were suited to our baby's ages which meant that we didn't have to sit out for those that were a little too advanced. The boys genuinely had a fantastic time, and got some much needed interaction with each other and other babies their age.
All in all, it was a fantastic class, and thanks to livingsocial we will be buying 4 lessons for $30 and then find out whether we want to sign up after that. We might be sick of it in a month, or we might want to join forever, who knows.
As far as we know at this point, Gymboree is a goer!
Sunday, July 10, 2011
Nana's 70th Birthday Dinner
Well all in all it was a successful weekend. The cake was a hit, and tasted delicious, wasn't dry at all as I was a tiny bit worried about. This time around, the fondant wasn't as thick, and actually got eaten as well, so that was also good.
We had dinner at Thai Diamond at Hervey Bay, and the two winner dishes were the Chilli Duck mmm mmm and the Soft Shell Crab.
So here is the final cake from almost every angle;

Hervey Bay is a beautiful part of Queensland, and somewhere that my partner Michael & I have holidayed many times, together as well as individually as children. I know it will be a place where we will continue to take Rylan and any other children we have for many years to come. It is growing at a rapid place, but I don't think it will ever totally be rid of its country town charm.
Here's the sunset that we sat and watched before dinner;
 One of the main things I wanted to achieve from this trip, apart from celebrating Nana's 70th Birthday, was a family photo that I could present to Nana, and also give a copy to each of smaller families involved. There are four generations in this photo, which to me is priceless. The last 4 generational photo I was involved in, was my great grandmother on my mother's side, her mother, my mother and me as a baby. Now, there are only me and my mum left, so the photo record is precious.
 Back row left to right: Beringen (my cousin), Nana (my paternal grandmother), Brett (my dad), Harry (my brother), Phoebe (my sister), Michael (my man) & Rylan (my baby boy)
Front row left to right: Rhiana (my cousin), Michelle (my aunty), Desleigh (my mum) & ME!
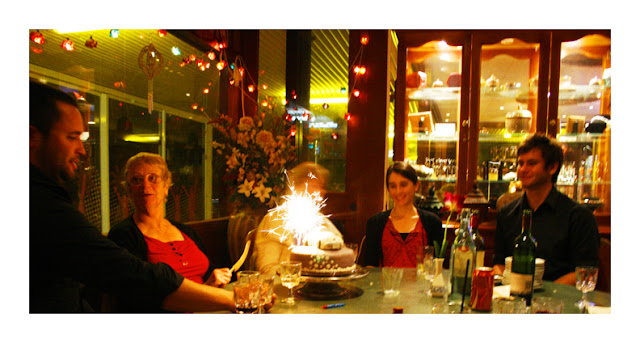
I bought some sparklers, one '7' and one '0' which created a spectacular show;

 Here's a cute shot of me and Rylan;
 And finally, here's Nana with the cake before we left the restaurant, went home and ate it;
 HAPPY BIRTHDAY NANA!!
We had dinner at Thai Diamond at Hervey Bay, and the two winner dishes were the Chilli Duck mmm mmm and the Soft Shell Crab.
So here is the final cake from almost every angle;
Hervey Bay is a beautiful part of Queensland, and somewhere that my partner Michael & I have holidayed many times, together as well as individually as children. I know it will be a place where we will continue to take Rylan and any other children we have for many years to come. It is growing at a rapid place, but I don't think it will ever totally be rid of its country town charm.
Here's the sunset that we sat and watched before dinner;


Front row left to right: Rhiana (my cousin), Michelle (my aunty), Desleigh (my mum) & ME!
I bought some sparklers, one '7' and one '0' which created a spectacular show;


Friday, July 8, 2011
VW Beetle Cake Completed!!! Yay
Soooo impressed with myself, normally I am sooo critical of myself, but for once I'm actually pleased.
I baked the cake & made the ganache, put it in the fridge overnight to firm up. Then I coated the cake in ganache the next day, smoothed it out and put it back in the fridge. The brilliant part about using ganache as the 'crumb' coating rather than buttercream (which in my opinion is sickly and inedible in large amounts) is that you don't have to level off the cake, you just fill in the lower parts with yummy chocolatey goodness.
The recipes that I used for my chocolate mud cake & ganache are as follows:
Ingredients
250 g butter, chopped
200 g dark chocolate
2 cups caster sugar
11⁄3 cups water
1 teaspoon instant coffee
3⁄4 cup plain flour
3⁄4 cup self-raising flour
1⁄4 cup cocoa
3 eggs, lightly beaten
Method
1. In a large saucepan, add the first 5 ingredients.
2. Melt together over a low heat until sugar is dissolved and butter and chocolate are melted. Allow to cool for 10 minutes.
3. Sift plain flour, self raising flour and cocoa intoa large mixing bowl.
4. Add the cooled liquid and beat gently.
5. Add the eggs and mix gently.
6. Pour mixture into a greased cake tin and bake at 150°C for 1 3⁄4 hours.
Recipe notes
My oven takes 2 hours, but a friend's oven only takes 11⁄2 hours to cook this recipe, so keep checking the cake.
This is the best mud cake I've eaten and best cake I have ever made. I have made it twice now and its so easy and delicious. A few notes of my own. The first time I made this cake which comes from Best Recipe's.com (click here to see), I started checking it every 5-10 minutes after the 1 hour mark. I stopped at 1hr 20mins but it was a little undercooked, and fell slightly in the middle, BUT after I put it in the fridge and ate it a couple of days later, it wasn't undercooked, it was awesome. This time I checked it at 1hr 15min and it wasn't quite done, so put it in for another 10 mins, and the scewer came out clean so I took it out. It barely fell this time, but I won't know if its overcooked until we cut it tonight. I think that it is going to be perfect, I just don't want it to be dry.
Another thing to note is that when you add the wet ingredients, regardless of how well the flours and cocoa are sifted, it gets very lumpy, lots of tiny lumps. I beat it with a wooden spoon and try and get rid of as many lumps as I can, but I couldn't get rid of them all, but it worked fine. I like that there are no double boilers to melt the chocolate, its just half of the ingredients in a saucepan, the other half in a bowl. Combine, pour in tin and bake. Its fabulous.
For the ganache, I put 200ml PURE cream (pauls brand) in a saucepan over a medium/low heat and bring to boiling point before pouring over 200g milk chocolate and 200g dark chocolate that I've broken up into individual squares. Leave it sit for a few minutes before stirring it together. If it doesn't all melt properly, pop it in the microwave for 20 seconds or so, and then you can whisk it a bit until its nice and smooth. I also added about a teaspoon of finely grated orange zest, just for something different. Then put it in the fridge overnight, and pop it in the microwave for 20 - 30 seconds to soften it slightly so its spreadable. It is absolutely delicious, and when cooled, it is quite firm so its a good base before the fondant goes on.
Once I finished the cake, and iced it (I forgot to take a photo unfortunately), I put it back in the fridge to firm up. When I applied the ganache, I should point out that at this stage I put it on plate I planned to serve it on, and then placed the plate on top of a non slip mat on top of a lazy susan so I could spin it around for ease.
Then it was time to colour my fondant. I initially thought I was going to use yellow, mainly due to the fact that it was a primary colour and I wouldn't have to mix two colourings together, but due to the fact there was so much silver already painted on the bug, I decided to go back to my original decision of purple and silver rather than yellow. It meant mixing the red & blue together, but I think it was a nicer choice. So I put a blob of red and a blob of blue in the middle of my fondant disk and I kneeded that sucker until it was all mixed through.
I have made this fondant before, and it worked out perfectly. Last time I made it, it was smooth, and easy to roll, and not crumbly or dry. Just right. The month was May.
This time around, it seemed different, drier, not as smooth. Not too sure why. After I finished kneeding all the colour through, and then rolled it out, you couldn't really tell it was dry, so I didn't worry too much. I had put a little water on my hands when kneeding to try and see if that would help, but I will have to do some reading to find out why it happened this time around.
I rolled it out the first time over my pastry mat, and it stuck, and broke, and it was awful. The next time I kept putting icing sugar behind it so it wouldn't stick after every few rolls. This time it was a success and I managed to cover the cake first time. I moulded it around the cake and cut off the excess. There are tiny little dry cracks around it, but you can only see it if you're looking with my critical eye, and overall it looks great.
Then I got got my sugar glue (tylose and water mixed together which I keep in a little jar) and pasted a generous amount in the middle. I positioned the bug on top and began gluing random flowers around the base to cover up the unsightly fondant edge. Then I scattered flowers strategically coming out from under the car and spraying over the side.

Once I was happy with the flower positions, I made dinner, fed Rylan and got to the business of painting centres on all the flowers. I decided to go with silver over purple as it seemed like a more logical choice. I also touched up any rough spots on the bug, and put an outline around the number plates to make them look more finished.

Not great photos, I know. It was a bit too dark, and I was using my Iphone. I will make sure to take lots of photos with my real camera today and when we cut into it and report about the party with them on Monday.
All in all, I feel quite satisfied with the outcome and can't wait to present it to my Nana and the rest of my family.
I baked the cake & made the ganache, put it in the fridge overnight to firm up. Then I coated the cake in ganache the next day, smoothed it out and put it back in the fridge. The brilliant part about using ganache as the 'crumb' coating rather than buttercream (which in my opinion is sickly and inedible in large amounts) is that you don't have to level off the cake, you just fill in the lower parts with yummy chocolatey goodness.
The recipes that I used for my chocolate mud cake & ganache are as follows:
Ingredients
250 g butter, chopped
200 g dark chocolate
2 cups caster sugar
11⁄3 cups water
1 teaspoon instant coffee
3⁄4 cup plain flour
3⁄4 cup self-raising flour
1⁄4 cup cocoa
3 eggs, lightly beaten
Method
1. In a large saucepan, add the first 5 ingredients.
2. Melt together over a low heat until sugar is dissolved and butter and chocolate are melted. Allow to cool for 10 minutes.
3. Sift plain flour, self raising flour and cocoa intoa large mixing bowl.
4. Add the cooled liquid and beat gently.
5. Add the eggs and mix gently.
6. Pour mixture into a greased cake tin and bake at 150°C for 1 3⁄4 hours.
Recipe notes
My oven takes 2 hours, but a friend's oven only takes 11⁄2 hours to cook this recipe, so keep checking the cake.
This is the best mud cake I've eaten and best cake I have ever made. I have made it twice now and its so easy and delicious. A few notes of my own. The first time I made this cake which comes from Best Recipe's.com (click here to see), I started checking it every 5-10 minutes after the 1 hour mark. I stopped at 1hr 20mins but it was a little undercooked, and fell slightly in the middle, BUT after I put it in the fridge and ate it a couple of days later, it wasn't undercooked, it was awesome. This time I checked it at 1hr 15min and it wasn't quite done, so put it in for another 10 mins, and the scewer came out clean so I took it out. It barely fell this time, but I won't know if its overcooked until we cut it tonight. I think that it is going to be perfect, I just don't want it to be dry.
Another thing to note is that when you add the wet ingredients, regardless of how well the flours and cocoa are sifted, it gets very lumpy, lots of tiny lumps. I beat it with a wooden spoon and try and get rid of as many lumps as I can, but I couldn't get rid of them all, but it worked fine. I like that there are no double boilers to melt the chocolate, its just half of the ingredients in a saucepan, the other half in a bowl. Combine, pour in tin and bake. Its fabulous.
For the ganache, I put 200ml PURE cream (pauls brand) in a saucepan over a medium/low heat and bring to boiling point before pouring over 200g milk chocolate and 200g dark chocolate that I've broken up into individual squares. Leave it sit for a few minutes before stirring it together. If it doesn't all melt properly, pop it in the microwave for 20 seconds or so, and then you can whisk it a bit until its nice and smooth. I also added about a teaspoon of finely grated orange zest, just for something different. Then put it in the fridge overnight, and pop it in the microwave for 20 - 30 seconds to soften it slightly so its spreadable. It is absolutely delicious, and when cooled, it is quite firm so its a good base before the fondant goes on.
Once I finished the cake, and iced it (I forgot to take a photo unfortunately), I put it back in the fridge to firm up. When I applied the ganache, I should point out that at this stage I put it on plate I planned to serve it on, and then placed the plate on top of a non slip mat on top of a lazy susan so I could spin it around for ease.
Then it was time to colour my fondant. I initially thought I was going to use yellow, mainly due to the fact that it was a primary colour and I wouldn't have to mix two colourings together, but due to the fact there was so much silver already painted on the bug, I decided to go back to my original decision of purple and silver rather than yellow. It meant mixing the red & blue together, but I think it was a nicer choice. So I put a blob of red and a blob of blue in the middle of my fondant disk and I kneeded that sucker until it was all mixed through.
I have made this fondant before, and it worked out perfectly. Last time I made it, it was smooth, and easy to roll, and not crumbly or dry. Just right. The month was May.
This time around, it seemed different, drier, not as smooth. Not too sure why. After I finished kneeding all the colour through, and then rolled it out, you couldn't really tell it was dry, so I didn't worry too much. I had put a little water on my hands when kneeding to try and see if that would help, but I will have to do some reading to find out why it happened this time around.
I rolled it out the first time over my pastry mat, and it stuck, and broke, and it was awful. The next time I kept putting icing sugar behind it so it wouldn't stick after every few rolls. This time it was a success and I managed to cover the cake first time. I moulded it around the cake and cut off the excess. There are tiny little dry cracks around it, but you can only see it if you're looking with my critical eye, and overall it looks great.
Then I got got my sugar glue (tylose and water mixed together which I keep in a little jar) and pasted a generous amount in the middle. I positioned the bug on top and began gluing random flowers around the base to cover up the unsightly fondant edge. Then I scattered flowers strategically coming out from under the car and spraying over the side.
Once I was happy with the flower positions, I made dinner, fed Rylan and got to the business of painting centres on all the flowers. I decided to go with silver over purple as it seemed like a more logical choice. I also touched up any rough spots on the bug, and put an outline around the number plates to make them look more finished.
Not great photos, I know. It was a bit too dark, and I was using my Iphone. I will make sure to take lots of photos with my real camera today and when we cut into it and report about the party with them on Monday.
All in all, I feel quite satisfied with the outcome and can't wait to present it to my Nana and the rest of my family.
Wednesday, July 6, 2011
Mama Finito le VW Bug Cake Topper.....parle l'anglais?
OK, so I realise that my foreign language skills are none too good n' stuff, but guess what I FINISHED THE CAKE TOPPER and I have never been so proud of myself over accomplishing something in my life, apart from creating an awesomely beautiful baby, this comes next haha.
I put on the finishing touches and finished it off nicely. I am surprised how good it looks, even if I do say so myself. I don't even worry about the fact that you an see the rice bubbles through the gum paste and think its looks rustic, like it should.
 I'm also proud of the fact that it all came from memory, no model of a car sitting in front of me. The only thing I did look at was the logo and how the VW was drawn so I could make the hub caps look good.
Wow, I like it. I hope my Nana does too!
Today I am designing a wedding album for a photographer I work for, and then I am making the delicious chocolate mud cake and ganache for the icing. They will sit in the fridge over night before I ice and put fondant over them tomorrow and do the best part, assembly.
I made the fondant last night, there is something so satisfying about making everything from scratch. For me I feel like its more of an accomplishment that buying pre-made things from the cake shop. Not that there's anything wrong with it, in fact, most people would be impressed that you bothered to do anything at all, but for me, making things from scratch makes me feel good, and that is passed on to the consumer...my family.
Can't wait to see the finished product. Need to go and buy some matching candles as well which I totally forgot about.
till next time.....
I put on the finishing touches and finished it off nicely. I am surprised how good it looks, even if I do say so myself. I don't even worry about the fact that you an see the rice bubbles through the gum paste and think its looks rustic, like it should.
Wow, I like it. I hope my Nana does too!
Today I am designing a wedding album for a photographer I work for, and then I am making the delicious chocolate mud cake and ganache for the icing. They will sit in the fridge over night before I ice and put fondant over them tomorrow and do the best part, assembly.
I made the fondant last night, there is something so satisfying about making everything from scratch. For me I feel like its more of an accomplishment that buying pre-made things from the cake shop. Not that there's anything wrong with it, in fact, most people would be impressed that you bothered to do anything at all, but for me, making things from scratch makes me feel good, and that is passed on to the consumer...my family.
Can't wait to see the finished product. Need to go and buy some matching candles as well which I totally forgot about.
till next time.....
Sunday, July 3, 2011
VW Beetle Cake Topper Progress
My Nana turns 70 this week, so a few months ago I contacted the whole family and told them we were going to Nana's home town for dinner and a big family photo to give her as a present. Nana lives in Maryborough, Qld and we are in Brisbane. The rest of the family is in Gladstone and Rockhampton, so it made the most sense to meet in Maryborough which is half way. I took the opportunity to think of an awesome cake to make as just yet another chance to bake and create!
So about a month ago or so I made some Rice Krispie Treats (recipe here) and before they had gone completely hard, I moulded a VW Beetle shape with the intent to cover and decorate with fondant and gum paste.
***I should explain; Nana drove a 1969 VW Beetle from about 1972 - circa 2000. That's a fair while. The original colour of the car was racing car green (deep dark green) but at some point, not too sure when, she had it repainted white. It was an awesome car, one of the first that I drove as a new driver and I loved it. Unfortunately, rust and extremely high mechanic bills forced the little bug off the road, but it'll always remain fondly in my memory. When I tried to think of what I could do that would best suit my Nana.....there was no other choice.***
So, anyway, I moulded the shape out of Rice Krispie Treats, and idea that I had seen on Ace Of Cakes. I don't know what I would do without the food channel. It worked out pretty well, and then I wrapped it up in baking paper and cling film and put it in the freezer. The treats only last a couple of days out of the fridge according to the website. I doubt anyone is going to eat it, but I still didn't want it to go bad.

As per my last post, I explained that my tylose gum paste didn't seem to be so successful, but yesterday I went to Big W and bought a pasta maker and a scalpul and conditioned some gum paste, and it worked brilliantly. The only regret I have is that I rolled out the main covering layer too thinly and you can see the bumps of the rice bubbles BUT by the time I glued it on, I just decided that I am the most picky, and that most people will be more impressed that it looks like a bug than the actual detail.
Once I covered in the main piece of white gum paste, I cut out two pieces for the doors, and then marked in the creases which I will be embellishing with silver paint later. Then for the tyres, I tried placing a flat piece of black on top of the wheels I moulded with the rice bubbles, but it looked ridiculous, so what I had to do, using my trusty knife, I cut out a hole so I could squish a ball of black gum paste in and then spread it out to be a tyre size and shape. I plan to put hub caps with the VW logo on them, but I was too tired to bother with that last night. Then I made some bumpers, which I will paint silver and I made a couple of licence plates which I will either paint with NANA or NANA 70 or something like that. Depends on my steady hand. I found out that if you mix a little of the gel colour with a tiny bit of vodka, using a super fine paint brush, you can use it as a paint.
I put two tiny blossom flowers on the front, which I will embelish with silver and yellow maybe later. And finally, I recovered the wheel covers with white, so that the car looked more finished. Oh, and I cut out grey bits for the windows and there are two door handles which I will paint silver.
So what I have to do; paint details silver, make a logo for the boot (or where the motor actually is), make 4 hub caps, paint the license plates and make thin borders around the windows and doors to make the car feel 'finished' I plan to put some of the gum paste through the spaghetti feature of the pasta maker.
You can still see rice krispie treat around the base of the car, which I will some how conceal with flowers most likely, to keep in line with the theme.

The party is this Saturday, and today is Monday so.....
Monday - vacuum up all the icing sugar that fell on the floor last night, and do the dishes haha
Tuesday - finish off details of car
Wednesday - make fondant
Thursday - bake cake & make ganache
Friday - ice cake with ganache & fondant & decorate
Saturday - drive to Maryborough
better get a wriggle on
So about a month ago or so I made some Rice Krispie Treats (recipe here) and before they had gone completely hard, I moulded a VW Beetle shape with the intent to cover and decorate with fondant and gum paste.
***I should explain; Nana drove a 1969 VW Beetle from about 1972 - circa 2000. That's a fair while. The original colour of the car was racing car green (deep dark green) but at some point, not too sure when, she had it repainted white. It was an awesome car, one of the first that I drove as a new driver and I loved it. Unfortunately, rust and extremely high mechanic bills forced the little bug off the road, but it'll always remain fondly in my memory. When I tried to think of what I could do that would best suit my Nana.....there was no other choice.***
So, anyway, I moulded the shape out of Rice Krispie Treats, and idea that I had seen on Ace Of Cakes. I don't know what I would do without the food channel. It worked out pretty well, and then I wrapped it up in baking paper and cling film and put it in the freezer. The treats only last a couple of days out of the fridge according to the website. I doubt anyone is going to eat it, but I still didn't want it to go bad.
As per my last post, I explained that my tylose gum paste didn't seem to be so successful, but yesterday I went to Big W and bought a pasta maker and a scalpul and conditioned some gum paste, and it worked brilliantly. The only regret I have is that I rolled out the main covering layer too thinly and you can see the bumps of the rice bubbles BUT by the time I glued it on, I just decided that I am the most picky, and that most people will be more impressed that it looks like a bug than the actual detail.
Once I covered in the main piece of white gum paste, I cut out two pieces for the doors, and then marked in the creases which I will be embellishing with silver paint later. Then for the tyres, I tried placing a flat piece of black on top of the wheels I moulded with the rice bubbles, but it looked ridiculous, so what I had to do, using my trusty knife, I cut out a hole so I could squish a ball of black gum paste in and then spread it out to be a tyre size and shape. I plan to put hub caps with the VW logo on them, but I was too tired to bother with that last night. Then I made some bumpers, which I will paint silver and I made a couple of licence plates which I will either paint with NANA or NANA 70 or something like that. Depends on my steady hand. I found out that if you mix a little of the gel colour with a tiny bit of vodka, using a super fine paint brush, you can use it as a paint.
I put two tiny blossom flowers on the front, which I will embelish with silver and yellow maybe later. And finally, I recovered the wheel covers with white, so that the car looked more finished. Oh, and I cut out grey bits for the windows and there are two door handles which I will paint silver.
So what I have to do; paint details silver, make a logo for the boot (or where the motor actually is), make 4 hub caps, paint the license plates and make thin borders around the windows and doors to make the car feel 'finished' I plan to put some of the gum paste through the spaghetti feature of the pasta maker.
You can still see rice krispie treat around the base of the car, which I will some how conceal with flowers most likely, to keep in line with the theme.
The party is this Saturday, and today is Monday so.....
Monday - vacuum up all the icing sugar that fell on the floor last night, and do the dishes haha
Tuesday - finish off details of car
Wednesday - make fondant
Thursday - bake cake & make ganache
Friday - ice cake with ganache & fondant & decorate
Saturday - drive to Maryborough
better get a wriggle on
Saturday, July 2, 2011
Gum Paste....simple enough concept wouldn't you say?
So the next cab off the rank cakewise is Nana's 70th birthday cake. Its going to be a round chocolate mud cake (I found a beautiful recipe and its just the best cake I've ever made) covered in light yellow fondant, covered in white with yellow centre tiny blossom flowers and on top is a white VW Beetle made of rice krispie treats and decorated with gumpaste. Sounds simple enough?
I have made gum paste once before using a recipe that included gum trag - but apparently its hard to come by and grossly expensive. I did find it in one shop, but I thought that if I am planning to do many cakes in the future, I need to make it cost effective as well. I did a bit of research and discovered that there are a few recipes using tylose powder which is I believe a vegetable gum powder. I watched a few youtube videos, no problem easy to make.
After I beat the egg whites slightly & added in the icing sugar, it said to add the tylose slowly - I should have added it in one go. I also should have used dough hooks instead of egg beaters, but lesson learned. I only have a hand mixer, so I'm sure a stand alone mixer would have been much easier. Anyway, not all the tylose mixed in quite properly, so I had to remove a few hard lumps when I was kneading the rest of the icing sugar in.
I got it to the consistency that I thought was correct, and then I put it in the fridge to rest over night as per instructions. The next day I played with a bit, coloured it, tried to add more shortening, more icing sugar, more tylose powder, and I tried to find instructions on what to do if it goes wrong, but no luck. Every time I tried to roll it into a ball, it would have creases and just wasn't the consistency of what I believed it should be.
I then found a YouTube lady who used a slightly well actually a very different recipe that she had developed over the years, and upon watching her later 'working with gum paste' videos, I realised that you have to condition the gum paste before using it. She uses a pasta maker and then rolls it back together and then pasta machine and then clumps it back together. Once I rolled it out a few times and then kneaded it for a while it worked really well when I rolled it out and cut out all the tiny blossoms. The texture was much smoother, but without a pasta machine, my hands were aching, and I had only really done a small portion of the actual work required.
Today, I am going to buy a pasta machine, I can't do the bug without it, unless I plan to spend hours rolling out....I don't.
I will credit Linda for her advice on gum paste conditioning, and you can check out her blog and her YouTube instructionals at the below link.
http://creativedesignsforcakes.blogspot.com
Once I finish the cake, I'll post all the photos. Can't wait to see the finished product. I can only hope that it really turns out as great as it does in my head
Subscribe to:
Posts (Atom)